
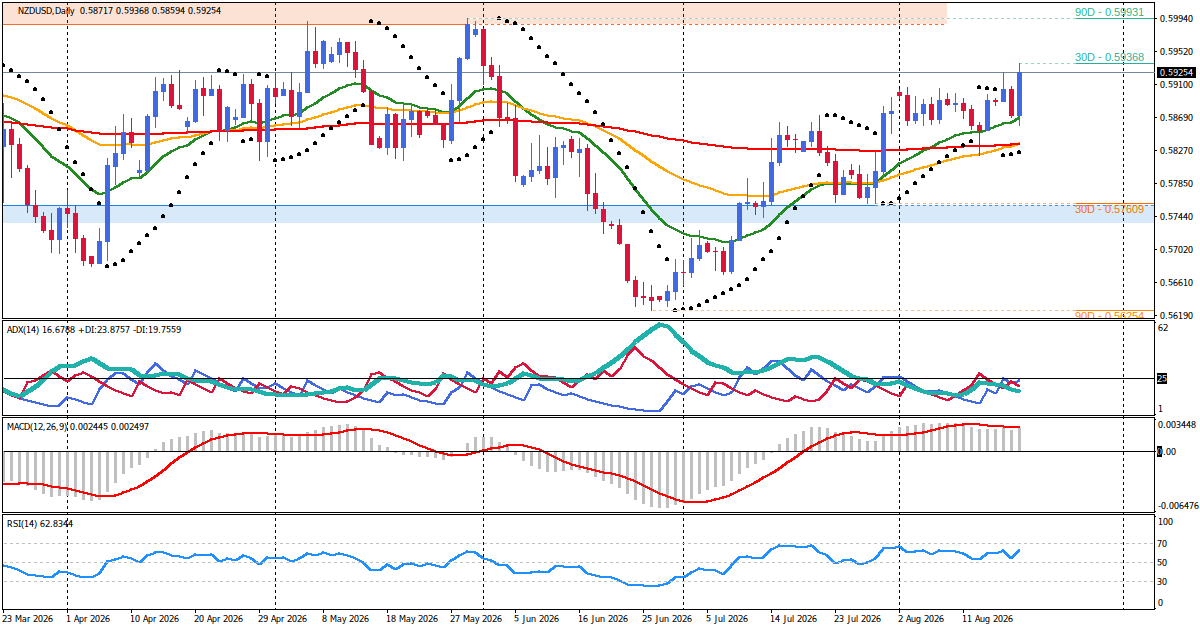
NZD/USD enters the late New York handover with a bullish-leaning bias and medium confidence, driven by a forceful H4 and H1 upward expansion that is pressing directly into the upper edge of a still-intact daily range. The rally is being powered primarily by broad US Dollar weakness after the Treasury announced plans to double liquidity buyback operations in longer-dated coupons, pulling long-end yields down and lifting the Kiwi toward 0.5930, its strongest level in months. The macro story is only partially aligned with the technical push: the near-term bullish impulse is supported by the Reserve Bank of New Zealand's hawkish stance, but the structural RBNZ-Fed yield spread still favors the Dollar and keeps the medium-term picture conflicted. With momentum stretched on the short-term charts, volatility elevated, and liquidity thinning into the Asian session, the pair is effectively positioned at a decision point between a daily breakout and a corrective rejection.
Technical Analysis
On the daily timeframe, the broader structure remains a range between roughly 0.5820 and 0.5938, with weak trend strength and neutral momentum. The latest daily bar pushed toward a local high near 0.5925 before pulling back toward the middle of its recent range, leaving the daily state mixed-to-flat rather than confirming a clean uptrend. The bullish case therefore rests on the medium-term and intraday charts, not on daily trend confirmation.
The H4 picture is bullish with moderate trend strength and expanding volatility. Price has staged a sharp impulse from the 0.5876-0.5880 zone to a 0.5937 high, followed by a holding pattern near the highs. H4 momentum remains bullish and has carried price beyond the upper Bollinger area, which supports the view that the upper range boundary is being challenged even though a daily breakout is not yet confirmed.
On H1, the upward structure is strong, with elevated volatility and stretched momentum. Price formed a clear impulse leg with a shallow pullback and is now compressed just below the 0.5937 swing high. The M30 chart confirms the bullish lean with moderate trend strength while volatility contracts, and the lower timeframes remain up but weak, coiling near 0.5934-0.5936 beneath the resistance shelf. The immediate condition is tense: compressed positioning near the highs leaves the next directional move dependent on either acceptance above 0.5936-0.5940 or a controlled pullback into support. With the market in a live session, late in the New York window, and liquidity thinning into the Asian handover, the backdrop is event-sensitive ahead of Australian employment data due early Thursday in UTC terms.
Key Price Levels
The relevant zones are drawn from daily, medium-term, and intraday swing structure, with approximate ranges in pips.
- Resistance zone 1: 0.5936 - 0.5940 — the recent swing-high cluster and upper daily Bollinger area; this is the immediate breakout trigger zone.
- Resistance zone 2: 0.5950 - 0.5957 — the psychological 0.5950 level and the H1/M30 upper Bollinger area; the next target band if the expansion extends.
- Support zone 1: 0.5920 - 0.5930 — recent H1 swing lows and the M30 EMA area; the near-term bullish trigger shelf that must hold to preserve the upward structure.
- Support zone 2: 0.5900 - 0.5910 — the psychological 0.5900 level and the H1 EMA area; the first meaningful retracement destination if the shelf fails.
- Support zone 3: 0.5878 - 0.5890 — the prior H4 range edge and H4 EMA cluster; a deeper demand zone that aligns with rising H4 moving averages and the broader bullish structure.
Fundamental Drivers
The dominant structural anchor for NZD/USD remains the RBNZ-Fed policy divergence. The Federal Reserve holds its target range at 3.50-3.75%, while the Reserve Bank of New Zealand's Official Cash Rate sits at 2.50% after a July hike. That leaves a persistent 100-plus basis point yield advantage for the Dollar, capping the Kiwi's upside over a one-to-six-month horizon. New Zealand's accelerating inflation, with June-quarter CPI at 4.1% year-over-year, forced the RBNZ to tighten, and the central bank's hawkish communication adds tactical support to the Kiwi. In the United States, the picture is more conflicted: July nonfarm payrolls unexpectedly fell by 23,000, yet headline CPI remains sticky at 3.4% year-over-year. That combination keeps the Fed cautious and leaves a September hold as the base case, which weighs on the Dollar.
Near-term, the fundamental story has shifted in favor of the Kiwi. The US Treasury's plan to at least double liquidity buyback operations in longer-dated nominal coupon sectors from $2 billion to at least $4 billion per operation between September 9 and November 4 pulled the 10-year yield back toward 4.65% after it traded above 4.70%, eroding the Dollar's yield appeal and pressuring the Greenback broadly. The July FOMC minutes, released Wednesday, were treated by traders as backward-looking: the three dissenting votes for a hike were seen as stale given softer inflation and weak jobs data since the meeting.
- Primary driver — RBNZ-Fed policy divergence: The 100+ basis point USD yield advantage remains the dominant medium-term anchor even after the RBNZ's July hike to 2.50%.
- Secondary driver — US labor softening: The unexpected 23,000 decline in July nonfarm payrolls introduces USD downside risk and could accelerate rate-cut expectations if subsequent data confirms a structural deterioration.
- Secondary driver — Lackluster dairy impulse: The August 4 Global Dairy Trade event delivered only a marginal +0.1% index gain with an average winning price of USD 3,778 per metric ton, too weak to support the Kiwi through export-income channels.
- Near-term catalyst — Treasury buyback plan: The increase in long-end coupon buybacks directly weakened the Dollar by compressing long-term yields and reducing the yield advantage of Dollar-denominated assets.
Overall, the macro picture only partially supports the technical structure. The yield-driven Dollar decline and the RBNZ's tightening bias align with the bullish H4/H1 expansion, but the structural yield spread, sticky US inflation, and lackluster dairy prices reinforce the daily range and the conditionally bearish longer-term view. That is genuine tension between tactical and structural signals, and it keeps confidence capped at medium.
Market Sentiment and Risk Environment
The broader environment is risk-positive for the Kiwi. The US Dollar Index fell sharply to its lowest level since late May as long-dated US yields dropped, and the Kiwi, as a risk-sensitive and commodity-linked currency, is a direct beneficiary of that rotation. The RBNZ's hawkish stance adds a local policy tailwind. Carry dynamics are also relevant: the Kiwi has high sensitivity to rate differentials, and while the absolute OCR disadvantage remains, the compression in long-end US yields reduces the penalty for holding Kiwi exposure and narrows the yield spread that has been the pair's dominant anchor.
The fragility in this setup is internal rather than external. Short-term RSI readings on the hourly chart are stretched into overbought territory, intraday positioning is compressed near the highs, and volatility remains elevated after the medium-term expansion. The combination of a fragile event window, thinning late-session liquidity, and overbought momentum means the sentiment backdrop supports further upside only if the resistance shelf is cleared cleanly. Otherwise, two-way rotation risk is elevated, and a sharp pullback could develop quickly if the immediate support shelf gives way.
Primary Scenario
The primary path is bullish continuation after a breakout attempt. Acceptance above the 0.5936-0.5940 resistance shelf on H1 and M30 closing basis would extend the H4 expansion toward the next band at 0.5950-0.5957. This scenario requires the pair to hold above the 0.5920-0.5930 support shelf and print a fresh higher low above 0.5927 to confirm that momentum is being sustained. A return below the 0.5920-0.5930 shelf would invalidate the bullish structure. This path is consistent with the current US yield-driven Dollar weakness and the RBNZ's hawkish communication, but it operates in a late New York to Asian handover with thinner liquidity and event risk from Australian employment data at 01:30 UTC. Confirmation-based evaluation is therefore more appropriate than anticipation in this window.
Alternative Scenario
The alternative path is a rejection at the daily range ceiling followed by a corrective pullback. Repeated failure at 0.5936-0.5940 with a lower high on H1 would signal that the daily range remains dominant. Confirmation would come with the loss of the 0.5920-0.5930 shelf, especially a close below 0.5927, which would open a retracement toward 0.5900-0.5910 and potentially deeper into the 0.5878-0.5890 demand zone. A decisive close above 0.5940 would invalidate the rejection setup. This path would be favored if the structural yield-spread anchor reasserts itself, for example if upcoming US data flow pushes back against near-term rate-cut pricing or if the Dollar's decline stalls. The macro backdrop, with sticky US inflation and a 100-plus basis point USD rate advantage, gives this corrective scenario meaningful underlying support even though it is not the dominant near-term path.
Economic Calendar and Catalysts
The calendar adds an event-sensitive overlay to an already extended intraday structure without implying a directional outcome. The following items are the most relevant for the pair and its drivers:
- August 19, 18:00 UTC — US FOMC Meeting Minutes (High impact): Fresh release; the market held firm near the highs afterward, treating the minutes as backward-looking given softer US inflation and employment data since the July meeting.
- August 20, 01:30 UTC — Australian Employment Change and Unemployment Rate (High impact; forecasts +11.7K and 4.4%): Secondary cross-market context for the Kiwi, with Australian labor data often setting the regional risk tone for the antipodean currencies.
- August 20 — New Zealand July trade balance (time not specified): Relevant for export and dairy income expectations, though the US side remains the dominant pair driver.
- August 20, 12:30 UTC — US Philadelphia Fed Manufacturing Index and US Unemployment Claims (Medium impact; forecasts 24.1 and 210K): Quote-currency catalysts that will test US Dollar sensitivity into the end of the week.
- August 20 — US Import and Export Price Indexes: Relevant as an imported-inflation signal; a hot reading would reinforce the Fed's cautious stance, while a soft one would support risk appetite and the Kiwi.
- August 18-19 — Global Dairy Trade Event 410: Recent auction risk; a sustained drop in whole milk powder prices below USD 3,400 per metric ton would pressure the Kiwi via weaker farmgate income expectations, while a rebound would offer short-term support.
Outlook
The balance of evidence is best described as continuation pressure against range-ceiling risk. Near-term momentum, the yield-driven Dollar decline, and the RBNZ's tightening bias favor an eventual test of the 0.5936-0.5940 breakout zone, but the daily range structure, overbought hourly conditions, and a macro backdrop that remains structurally bearish for the Kiwi over the medium term keep confidence capped at medium. The dominant tension is between persistence of the H4/H1 expansion and the pull of the daily range and rate differential. A confirmed daily break above 0.5936-0.5940 would shift the picture from ranging to breakout, while failure to hold the 0.5920-0.5930 shelf would open a corrective rotation back toward 0.5900-0.5910. Into the Asian and New York windows, the pair is likely to remain highly sensitive to US yield dynamics, Australian employment data, and any fresh news on dairy prices, with two-way volatility elevated given stretched positioning.
Disclaimer: This is not personalized financial advice. The information is for educational purposes only and does not guarantee any future outcome.


